

Migrating away from Netlify Identity for Decap CMS

With Netlify Identity now deprecated, finding a reliable alternative to handle the authentication / GitHub gateway flow for Decap CMS has become urgent for many developers, myself included as I use Decap CMS for many of my clients. This post guides you through migrating to DecapBridge, a free and easy to set up solution built specifically for Decap CMS.
Why DecapBridge instead of other solutions?
Netlify’s officially recommended path involves a complex upgrade requiring:
- Setting up Auth0 for user authentication
- Implementing a backend client to connect Decap CMS with your GitHub repository
I was deep into various documentations when I found out about DecapBridge, a simpler solution created by Alexandre Lotte from Millisecond Studio (@loteoo on GitHub). After Alexandre reached out to us on Discord about his tool, we were impressed with how elegantly it solves the authentication and the Github backend management problem.
Some of the features that made me pick DecapBridge:
- Smooth experience for clients: I didn’t want to have to ask my clients to create a GitHub account just to use the CMS. DecapBridge allows you to invite users via email, and they can log in with their email address.
- Free: DecapBridge is free to use, making it an attractive option for developers and teams.
- No complex setup: Unlike the official Netlify solution, DecapBridge doesn’t require setting up Auth0 or a backend client.
- Appealing design: The Netlify Identity interface was a bit annoying to deal with, especially the user management, and DecapBridge offers a more modern and user-friendly design.
Prerequisites
Before you begin the migration process, make sure you have:
- An existing Decap CMS site using Netlify Identity
- Your site repository hosted on GitHub
- Admin access to your Netlify account
- A deployed site (doesn’t have to be on Netlify)
Migration Process
Step 1: Remove Netlify Identity
First, you’ll need to remove the existing Netlify Identity implementation:
-
Log in to your Netlify account
-
Navigate to Projects > Your-Site
-
Go to Project Configuration > Identity
-
Delete the Netlify Identity instance
-
In your project code, locate
/src/pages/admin.astro(or equivalent) and remove the Netlify Identity script
Step 2: Set Up DecapBridge
-
Visit https://decapbridge.com/ and create an account
-
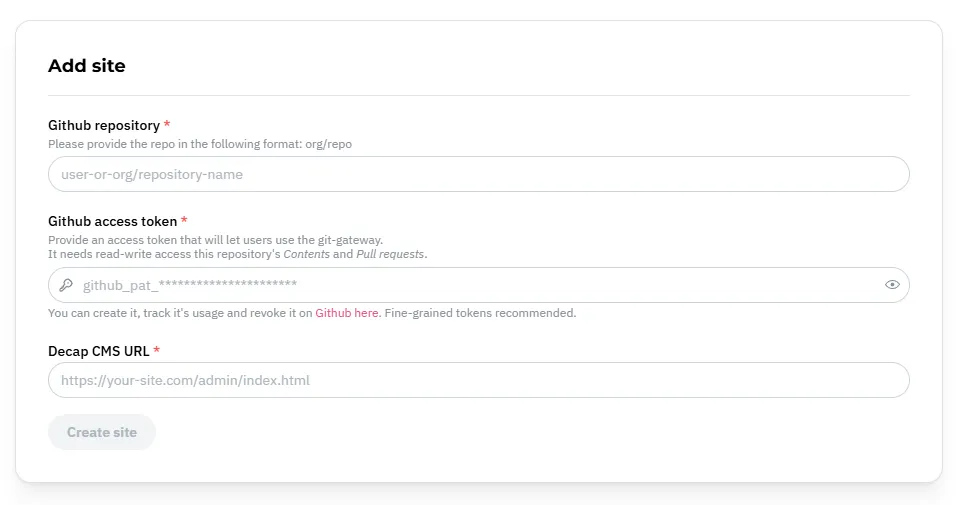
From the dashboard, click Create New Site. You will see this screen:
-
Fill in the required fields:
-
GitHub Repository Information
Enter your repository in the format
user-or-org/repository-name -
Generate a GitHub Personal Access Token
To create a personal access token, follow these steps:
- Log into your GitHub account
- Click your profile picture (top right) (not the repository profile) and select Settings
- Scroll down and click Developer Settings
- Select Personal access tokens > Fine-grained tokens
- Click Generate new token and provide your password again if required.
- Provide the following details:
- Note: DecapBridge Access (or any meaningful name)
- Expiration: Set to “No expiration”
- Repository access: Select “Only select repositories” and choose your site repository
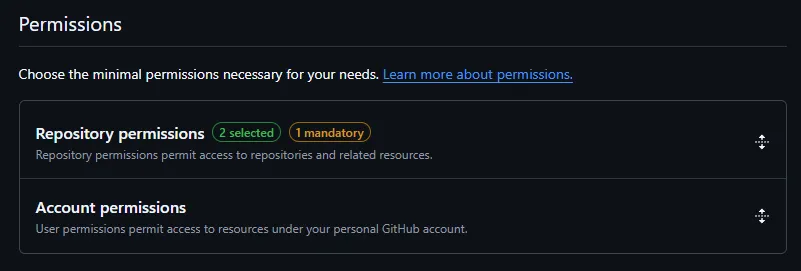
- Permissions:
- Repository permissions > Contents: Read and write
- Repository permissions > Pull requests: Read and write
- Click Generate token and copy the token value (you won’t be able to see it again)
-
Decap CMS URL
Provide the URL of your Decap CMS dashboard, typically in the format
https://your-site-domain.com/admin/
-
Step 3: Update Your Decap CMS Configuration
In your repository, locate your Decap config.yml file and replace the existing backend configuration with the snippet provided by DecapBridge:
# Use DecapBridge auth (required)
backend:
  name: git-gateway
  repo: your-username/your-repository # provided by decapbridge
  branch: main
  identity_url: https://auth.decapbridge.com/sites/your-site-id # provided by decapbridge
  gateway_url: https://gateway.decapbridge.com # provided by decapbridge

  # Optional: Improved commit messages
  commit_messages:
    create: Create {{collection}} "{{slug}}" - {{author-name}} <{{author-login}}> via DecapBridge
    update: Update {{collection}} "{{slug}}" - {{author-name}} <{{author-login}}> via DecapBridge
    delete: Delete {{collection}} "{{slug}}" - {{author-name}} <{{author-login}}> via DecapBridge
    uploadMedia: Upload "{{path}}" - {{author-name}} <{{author-login}}> via DecapBridge
    deleteMedia: Delete "{{path}}" - {{author-name}} <{{author-login}}> via DecapBridge
    openAuthoring: Message {{message}} - {{author-name}} <{{author-login}}> via DecapBridge

# Better Decap + Bridge logo (optional)
logo_url: https://decapbridge.com/decapcms-with-bridge.svg

# Add site links in DecapCMS (optional)
site_url: https://your-site-domain.comStep 4: Verify and Test
- Commit and push your changes to GitHub
- Deploy your site with the updated configuration
- Navigate to your Decap CMS admin page (usually
/admin/) - Log in using your DecapBridge credentials
Adding Team Members and Clients
One of the advantages of DecapBridge is its streamlined user management:
-
Go to your DecapBridge dashboard
-
Click on your site
-
Select the Manage Collaborators tab
-
Enter the name and email address of your team member or client
-
Click Send Invitation Email
Your invitee will receive an email with instructions to create their DecapBridge account and access the Decap CMS dashboard. Their DecapBridge login credentials will work on this CMS admin interface.
Troubleshooting Common Issues
Authentication Failures
If you’re experiencing authentication issues:
- Verify your GitHub token has the correct permissions
- Ensure the repository path is correct in your config.yml
- Check that your site URL matches the one registered in DecapBridge
Content Not Saving
If content changes aren’t being saved:
- Check your browser console for errors
- Verify GitHub token permissions include “Pull requests”
- Ensure your repository’s branch name matches the one in config.yml
Conclusion
Migrating from Netlify Identity to DecapBridge provides a straightforward path forward now that Netlify Identity is deprecated. As a front-end developer, I was sweating bullets at the idea of rolling my own backend solution to handle auth, and I was relieved to find DecapBridge. It offers the simplest approach to maintaining your Decap CMS authentication.
Thanks to Alexandre Lotte for creating this valuable tool that saves us from implementing a much more complex authentication flow.
Have you tried the migration? Let me know if you encounter any issues or have any questions.
Looking to level up your overall development workflow? Check out our list of top VSCode extensions for front-end developers.


